


Forwarding is the core feature of FLOWIN, around which all its other Telegram automation features are built.
Article contents
Forwarding features and capabilities
You can think of forwarding as a flow of information from a source to a destination. The service makes these flows easy to manage. For example, you can automatically filter, modify, generate and merge the information being forwarded, and even set delays, intervals and a schedule for it!
FLOWIN lets you copy and forward messages from any Telegram chats, channels, bots, topics, groups and forums, even when copying and forwarding are restricted.
Access to chats
The connected account must have access to the source, and the sender must have permission to post in the destination. For a chat that restricts forwarding, choose “Copy” mode.
Setting up automatic forwarding
Setting up automatic forwarding in Telegram with FLOWIN is very simple. Before you begin, make sure you have already connected an account that belongs to the chats you will use for forwarding.
The process of creating a forward is described step by step below:
Open @flow_in_bot, send the
/startcommand, and click “Control panel”.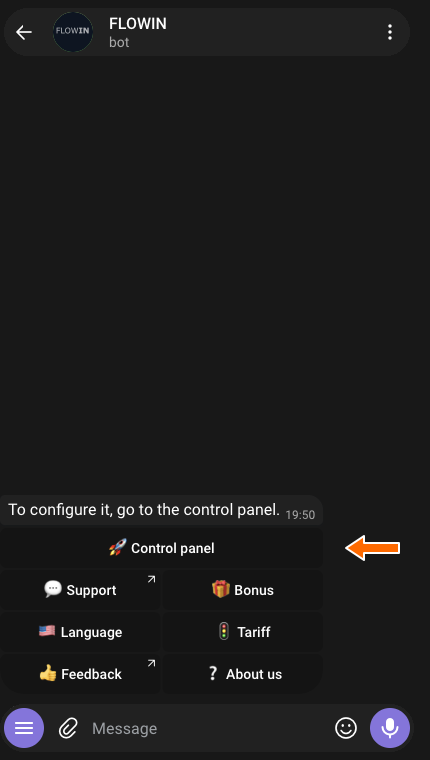

Accessing the control panel through @flow_in_bot. - Go to the “Forwards” page.
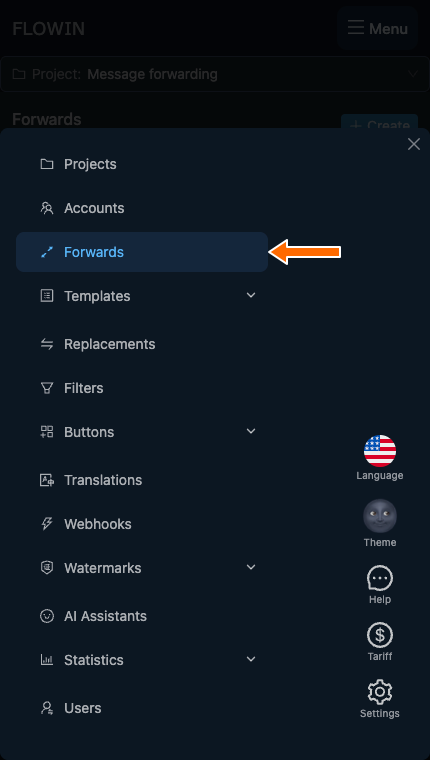
The “Forwards” section in the FLOWIN menu. - Click “Create”.
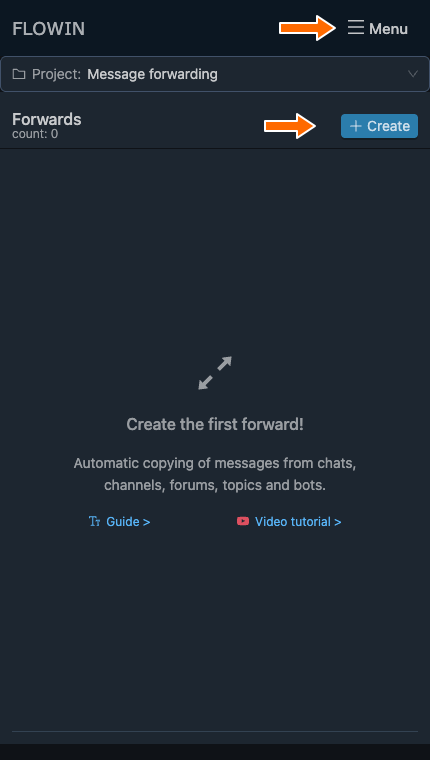
The button for creating a forward. - Choose a forwarding mode.
“Copy” is a mode that lets you modify messages and bypass forwarding restrictions. Messages are copied rather than forwarded. The original author is not shown, but you can add information about the author to the message text using replacements.
“Repost” forwards the original messages without the ability to modify them or mirror edits made in the source. The original author is shown.Telegram limitations
In “Repost” mode, the listener and sender must be the same account, and the source must allow forwarding.
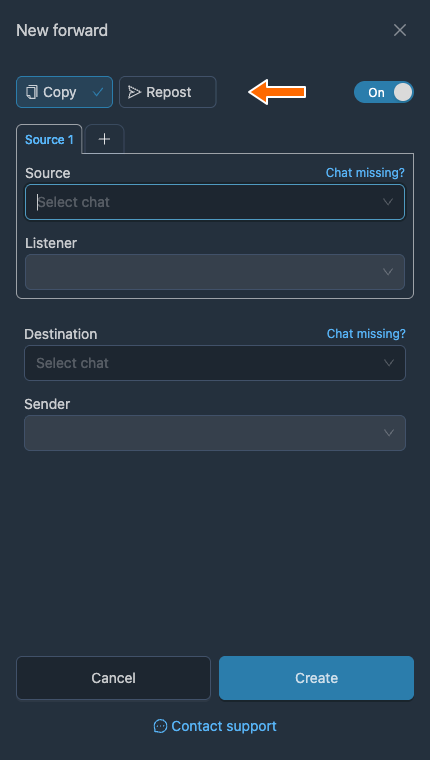
Choosing “Copy” or “Repost” mode. - Choose the “Source” from which messages will be forwarded. To add more sources, click “+” next to the “Source 1” tab and complete the new tab.
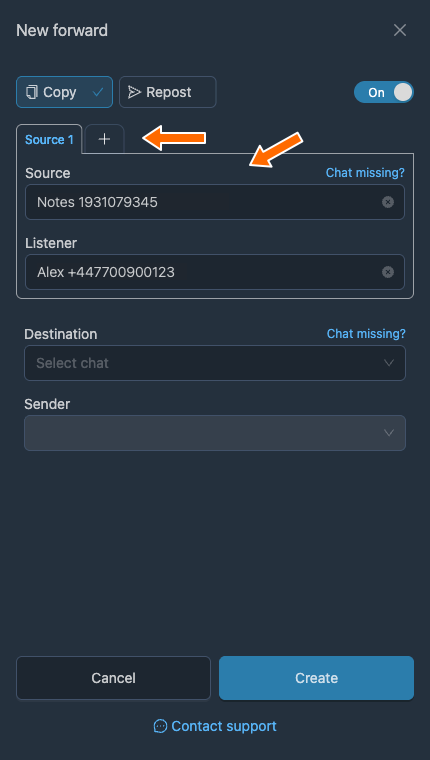
The selected message source. - Choose the “Listener”, the account that will receive messages from the source. This choice is available if you have connected more than one account that belongs to the selected source.
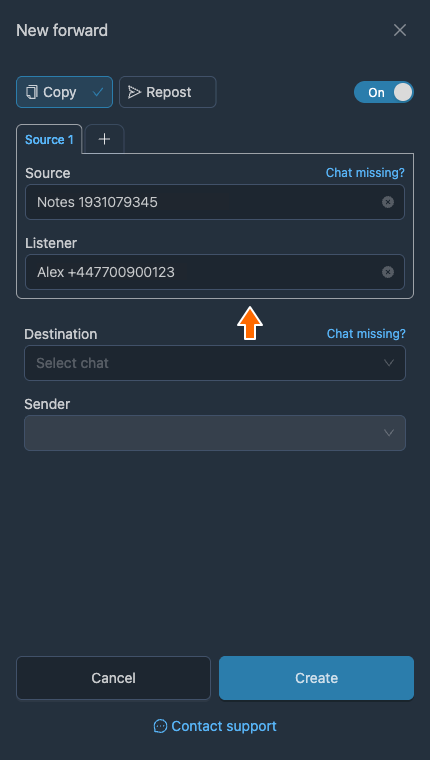
The account listening to the source. - Choose the “Destination”, the place where messages will be forwarded. A forward always has one destination. To send messages from one source to several destinations, simply create several forwards with the same source and different destinations.
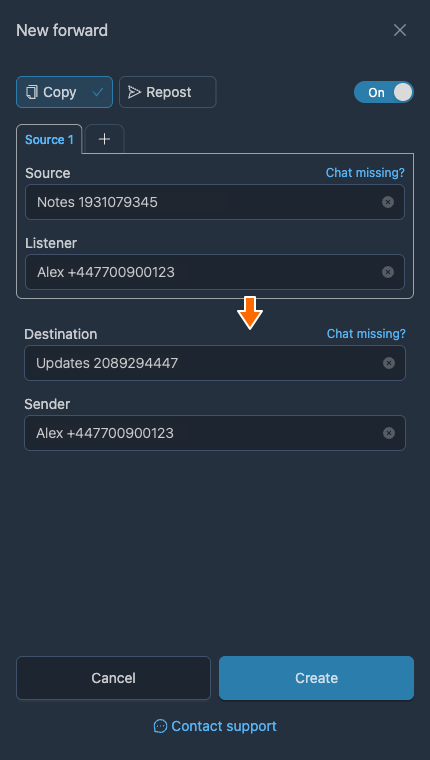
The selected message destination. - Choose the “Sender”, the account that will send messages to the destination. This choice is available if you have connected more than one account that belongs to the selected destination. If two or more connected accounts belong to the selected destination, the “Senders rotation” option also appears. It distributes the load evenly across all available accounts, significantly speeding up forwarding when the volume of messages is too high for one account to handle.
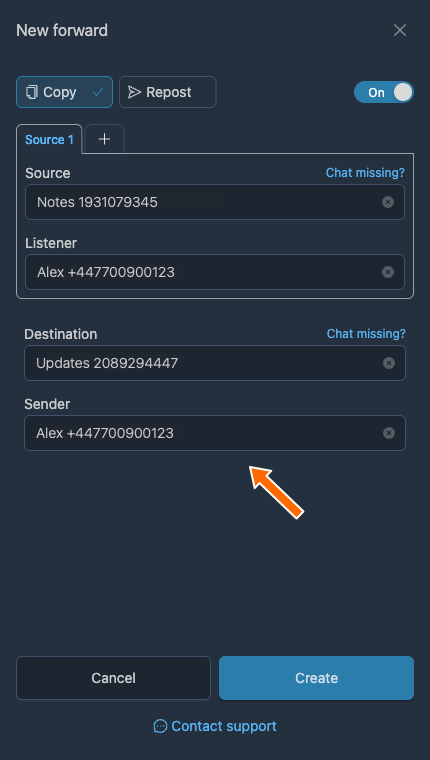
The sender account. - Leave the “On” switch enabled and click “Create”.
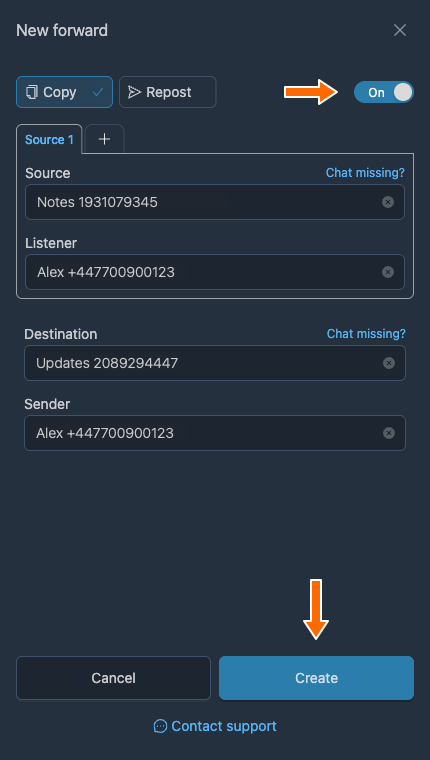
Creating an enabled forward. - Make sure the forward appears in the list and is enabled. Send a new message to the source or wait for one to appear, then open the destination in Telegram and check the result.
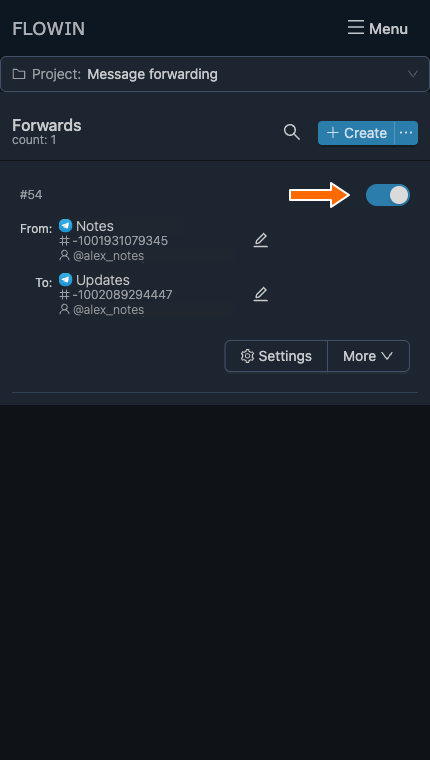
The newly created, enabled forward.
After you complete these steps, the new forward appears in the list. From this point on, all new messages from the source chat will be forwarded automatically to the destination chat.
Start with a simple check
For your first check, choose two of your own chats and a short message. Once delivery succeeds, add filters, replacements and other settings.
Forwarding from groups, channels, chats and bots
In FLOWIN, you can use any Telegram chat, channel, bot or group as a forwarding source, whether public or private, including those that restrict forwarding and copying.
If the chat you need is missing from the list:
- Click “Chat missing?” next to the source or destination field.
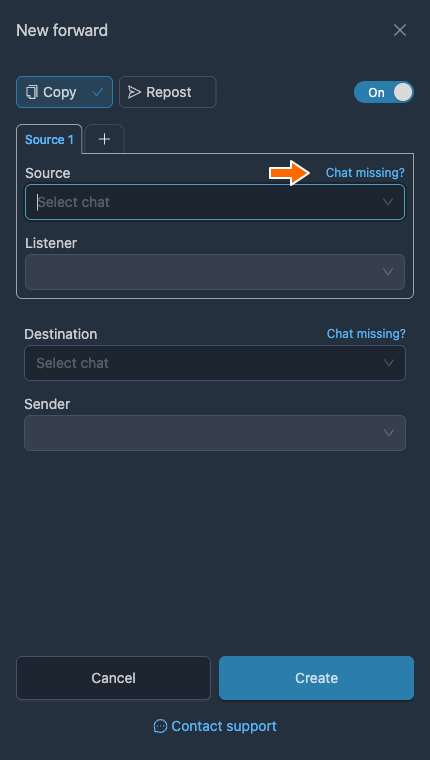
The “Chat missing?” link when creating a forward. - Check that the connected account has joined the chat. If the chat belongs to someone else, pin it in your Telegram chat list. If you are an administrator, send a message to it. Click “Refresh” in the help window and look for the chat in the list again.
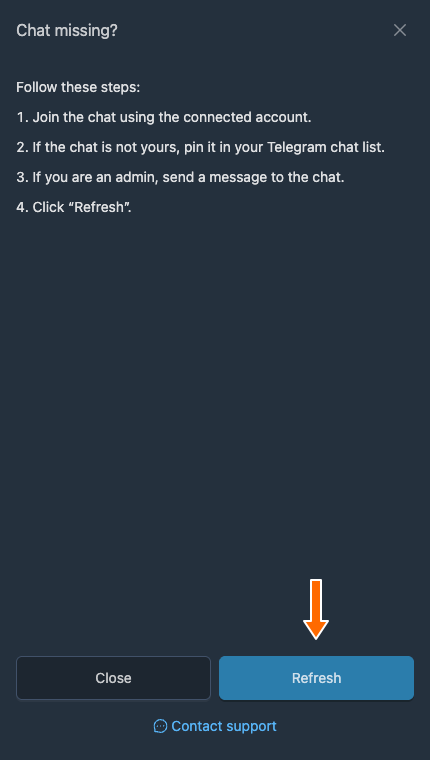
Refreshing the chat list.
The refreshed list lets you select a chat that the connected account can access. If the chat still does not appear, check the account's connection and its access to the chat.
Forwarding from a folder
Folders in Telegram let you group several chats, channels or groups under one name.
When creating a forward, you can select an entire folder as the source. The service then adds the chats in that folder as forwarding sources.
When the folder's contents change, the service automatically updates its associated sources. You do not need to select the folder again.
Select a folder in the “Source” field and the account it belongs to. Folders are available for user accounts connected by phone.
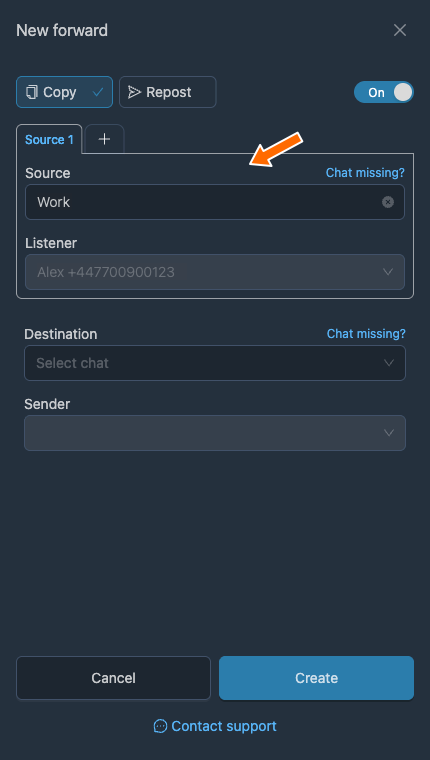
Forwarding from groups with topics
When creating a forward, the source can be a group with topics (a forum). An additional field then appears, where you can select a specific topic or leave all topics selected as the source.
Only user accounts connected by phone can retrieve the list of topics; bot accounts cannot. For bots, instead of a topic selection list, a field appears where you enter a specific topic ID. The topic ID is given in the thread parameter or before the message ID in a link such as t.me/name/topic/message or t.me/c/group/topic/message.
After selecting the group, specify a topic in the additional field or leave “All topics” selected. For a bot, fill in “Forum topic ID”.
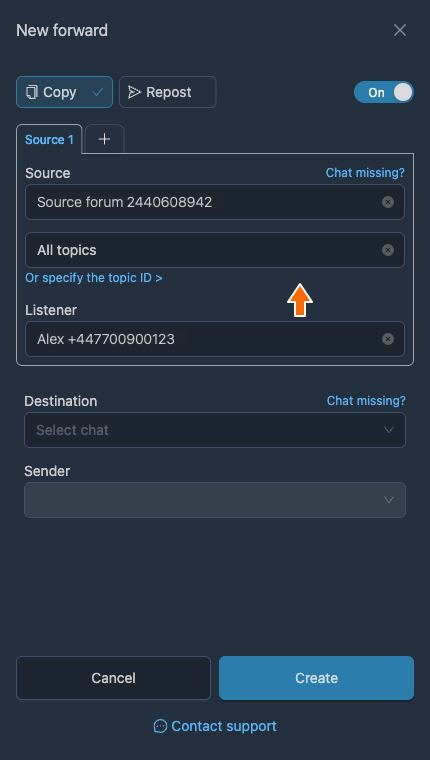
Forwarding all private conversations
In FLOWIN, when creating a forward, you can select “All personal dialogs” as the source. This forwards messages from all private conversations with people and bots, excluding messages in channels and groups.
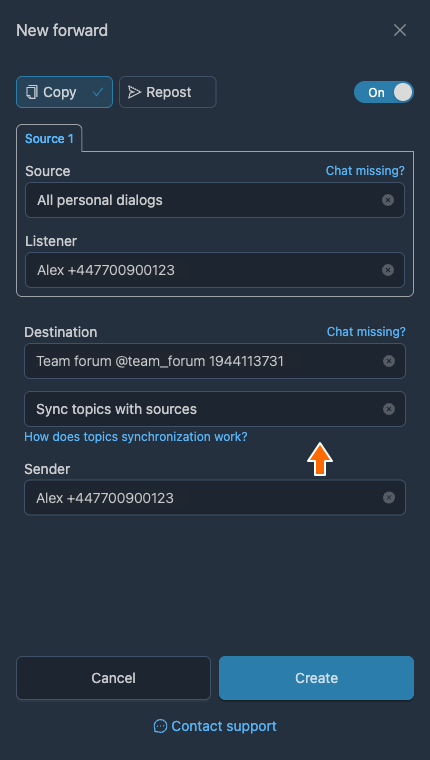
This feature only makes sense when the destination is a group with topic synchronization enabled. Messages are then forwarded to a separate topic created for each conversation in the destination group, instead of being mixed together. The service creates these topics automatically. This lets you keep a copy of all your private conversations.
If, in addition to topic synchronization, you enable back reply in the forwarding settings, you get a fully functioning support account. You and your assistants can communicate with customers on behalf of the connected account and oversee the conversations in one group with topics, where each topic is a separate customer chat.
Using all private conversations as a single source requires a plan with no limit on the number of sources.
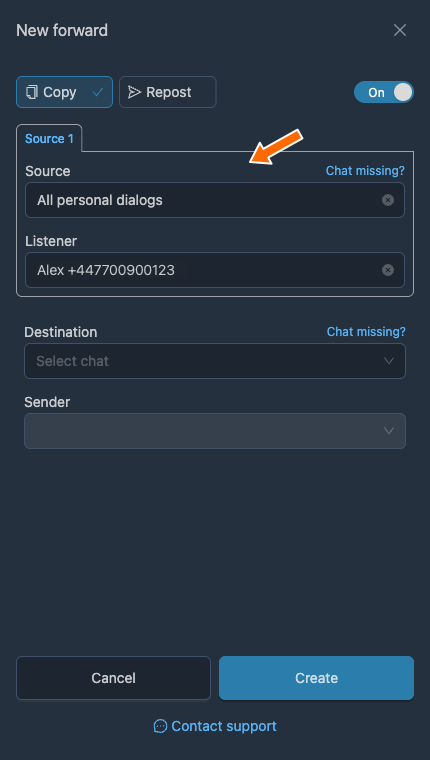
Topic synchronization in the destination group
A forward's destination can be a group with topics. An additional field then appears for enabling topic synchronization or choosing a specific topic.
The way topic synchronization works in the destination group depends on the source type and has several specific characteristics:
- If the source is a group with topics, the service automatically creates topics with matching names in the destination group. Their names are updated to match the topic names in the source.
- If the sources are channels or groups without topics, a topic is created in the destination group for each source, using the name of the source the message came from.
- If the sources are private conversations, a separate topic is created in the destination group for each conversation. The topics use the users' names and IDs.
- If a topic with the same name already exists in the destination, it is reused instead of creating a new one.
- Topics are created automatically when messages from them are forwarded, not immediately after the forward is created.
Select the destination group and “Sync topics with sources” in the topic field. The sender needs permission to create topics in that group.
Forwarding old messages
Once you create an automatic forward, it works in real time, forwarding all new messages from the source to the destination. However, you can forward old messages too.
Enable the forward before starting to forward old messages.
Forwarding old messages for a period
This method is available for an account connected by phone. To forward old messages for a period:
- In the row for the forward you need, open “More” → “Old messages” → “For the period”.
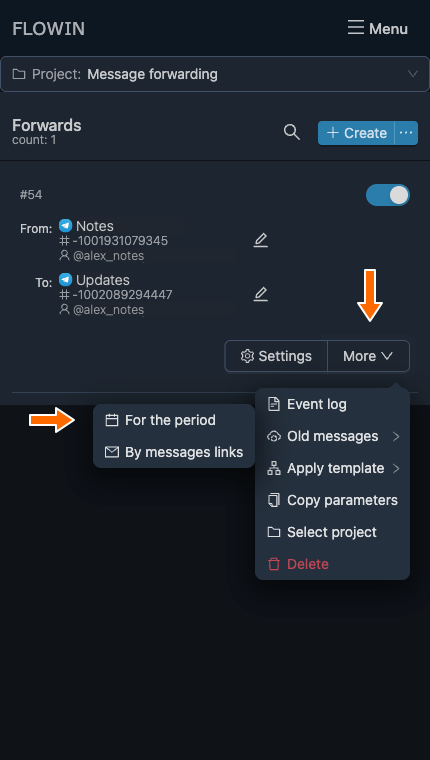
Old messages: starting forwarding for a period. - Specify the start and end dates. To include messages from the last week or another period leading up to the present, select “Recent period” and set the duration.
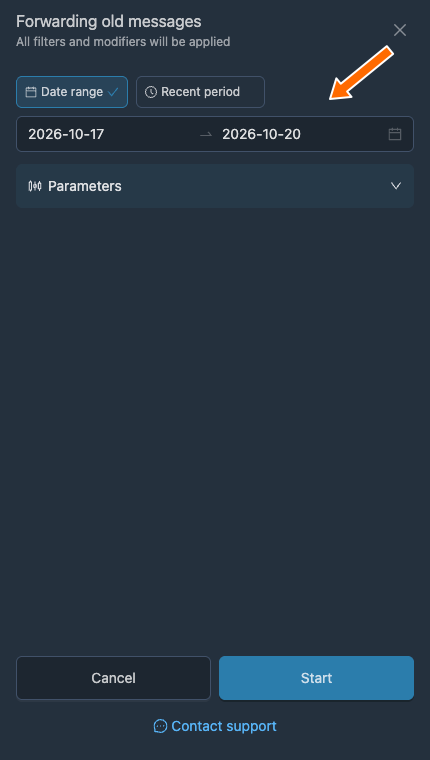
A history period defined by start and end dates. 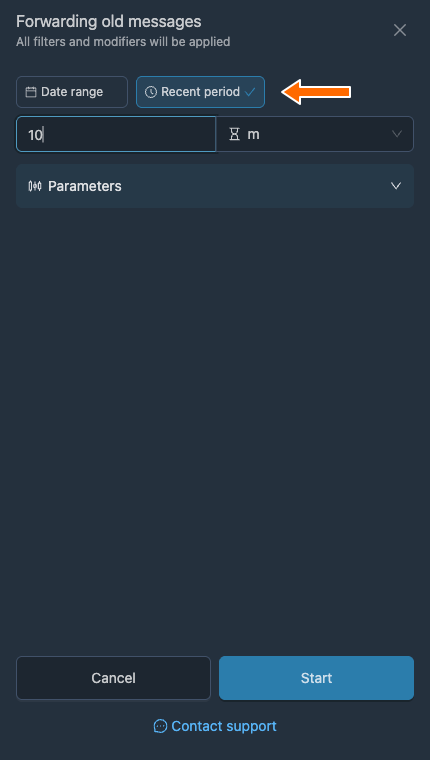
History for a recent period. - Click “Start”.
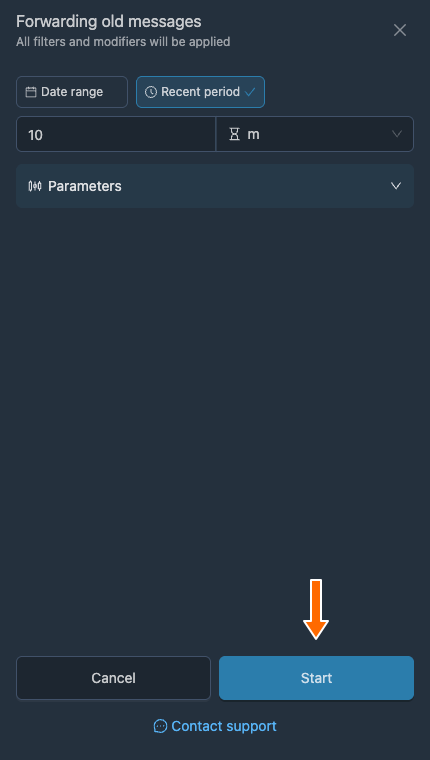
Starting history forwarding. - Wait for the process to finish in the progress window and check the messages in the destination.
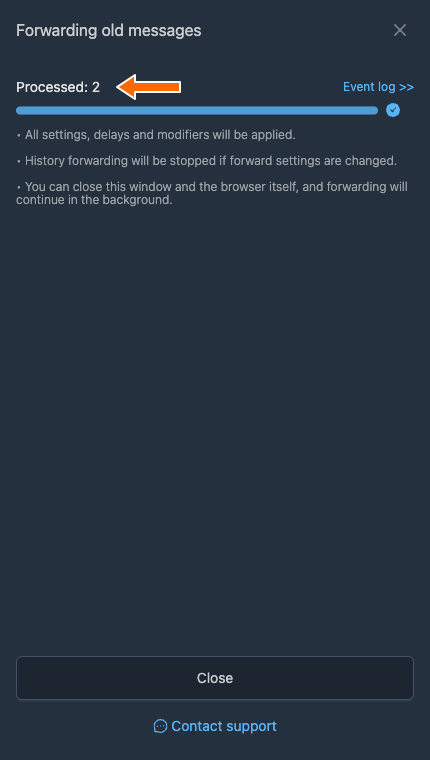
History forwarding complete: two messages processed.
Once started, old messages from the specified period begin to be forwarded. The progress window contains these buttons:
- “Event log” opens the forwarding logs.
- “Hide” hides the window; the process continues in the background, even if you close the browser.
- “Stop” stops the history forwarding process.
To reopen the progress window, click “History forwarding” in the row for the forward you need.
Advanced settings for forwarding by period
Alongside the period itself, the dialog for forwarding old messages by period contains other settings. You can change these as needed or leave the defaults. Click “Parameters” to open them.
- “Previously forwarded”: “Skip” is selected by default to avoid sending messages that have already been processed. To forward them again, select “Forward again”.
- “Sorting”: oldest first, newest first, random order or most popular. For popular messages, you can configure the popularity formula. By default, messages are processed from oldest to newest.
- “Message count”: “No limit” is selected by default; you can choose “At most” a specified number of messages. The process finishes when it reaches that limit.
- “After completion”: “Stop” is selected by default. “Repeat after” starts history forwarding again with the same parameters after the specified pause.
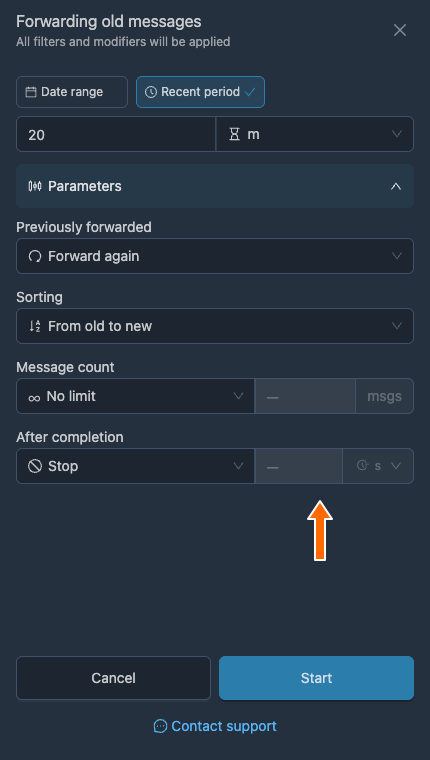
Repeated history forwarding and new messages
While repeated history forwarding is running, this forward does not process new messages, including between repeats.
Forwarding old messages by links
Sometimes you need to forward specific old messages. To do this:
- In the forward's row, open “More” → “Old messages” → “By messages links”.
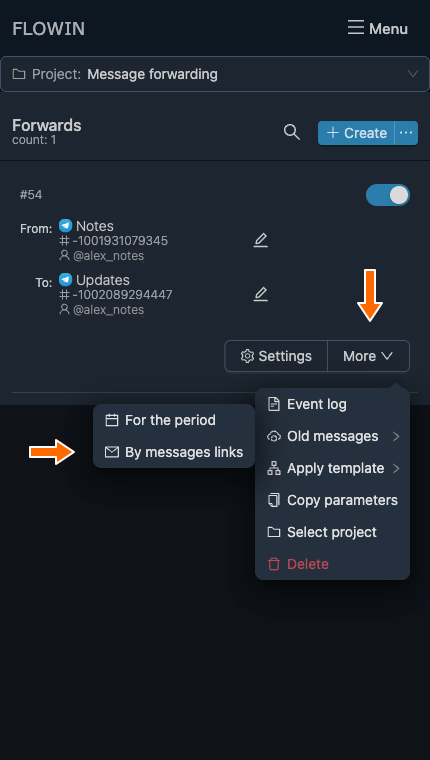
Old messages: starting forwarding by links. - In “Messages links or id”, specify messages from the source. You can enter each link or ID on a new line, or use a range or list, such as
12-34,37or3;5;8;9. If you need to send them again, select “Forward again” under “Previously forwarded”. Click “Start”.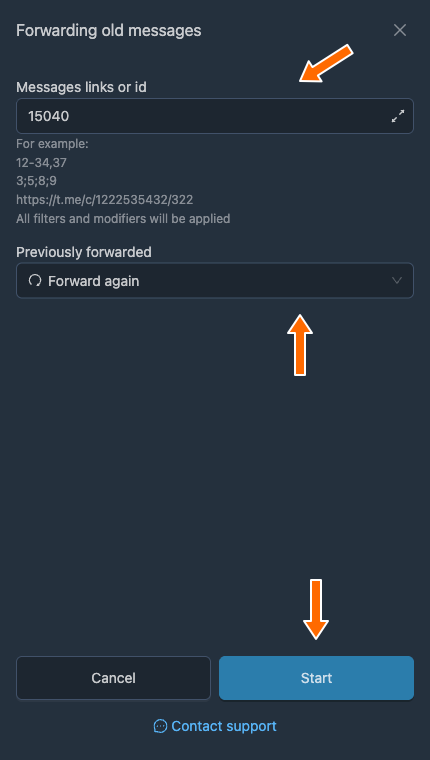
History by message ID, with repeat forwarding. - Wait for history forwarding to finish and check the requested messages in the destination. As with forwarding by period, the process appears in the progress window.
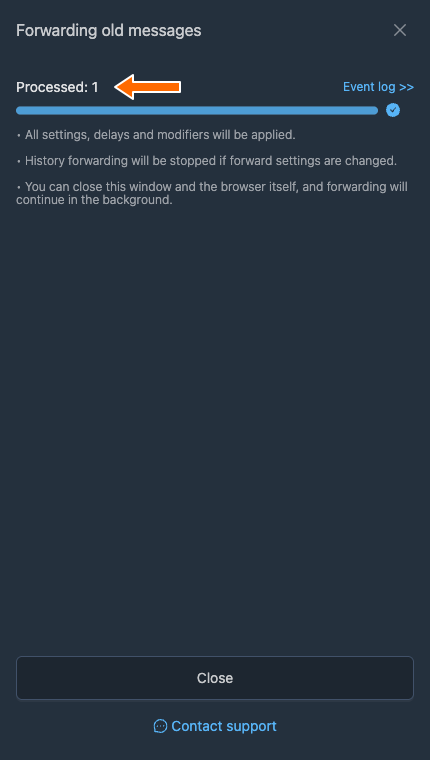
One specified message has been processed.
Basic forwarding settings
Each forward has a wide range of settings and modes. Supported settings apply both to real-time forwarding and to forwarding old messages.
- On the “Forwards” page, click the “Settings” gear button in the row for the forward you need.
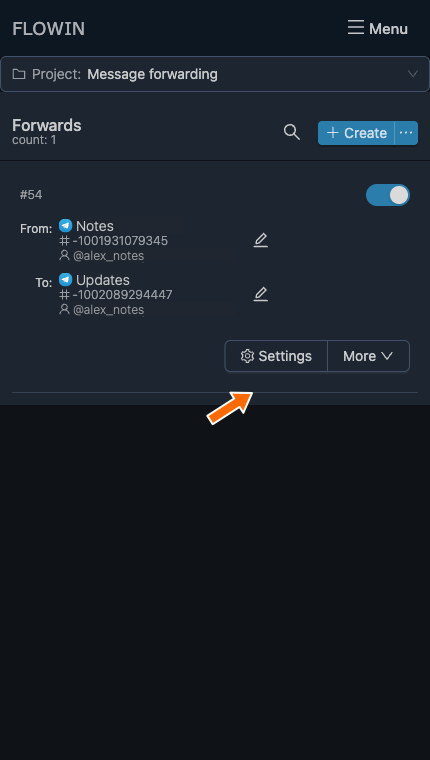
The forward's “Settings” button. - Open the tab you need and change the parameters. The available tabs depend on the sources, sender and forwarding mode.
- Click “Save” to apply your changes. “Cancel” closes the window without saving.
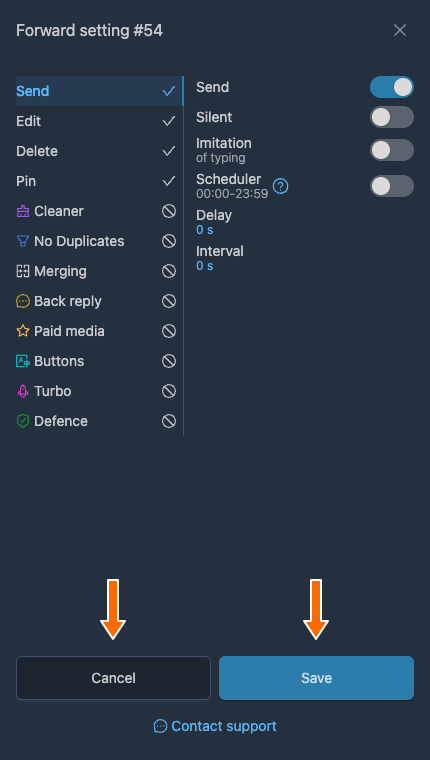
Saving the forwarding parameters.
All settings are grouped into tabs, which you can switch between on the left side of the dialog. The settings for the selected tab appear on the right.
Sending settings
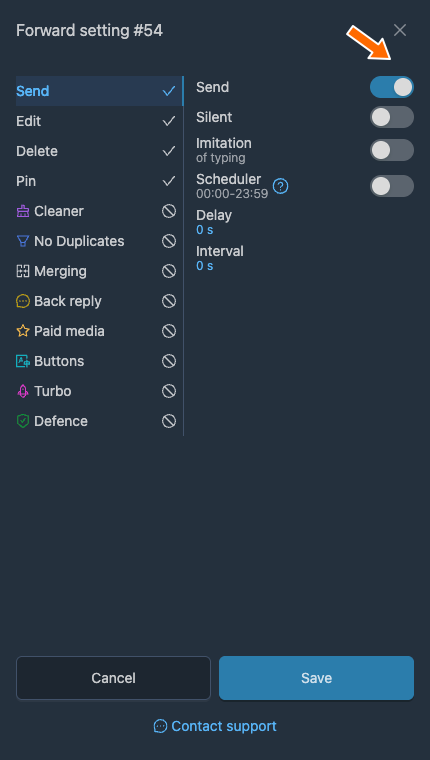
The “Send” tab contains these settings for sending new messages from the source to the destination:
- “Send” is the basic function for forwarding new messages from the source to the destination. It is enabled by default, and turning it off only makes sense in very rare, specific scenarios.
- “Silent” sends new messages without sound; notifications may still appear.
- “Imitation” displays a typing animation before the message is actually sent.
- “Scheduler” lets you schedule messages using Telegram's own tools. The service calculates the sending date and time from the intervals, delays and sending periods you specify. All scheduled messages go into Telegram's scheduled message queue. To open it, click the clock icon next to the message field in the Telegram chat. You can manually edit or delete scheduled messages, or change their sending time, making this a useful way to moderate forwarded messages manually.
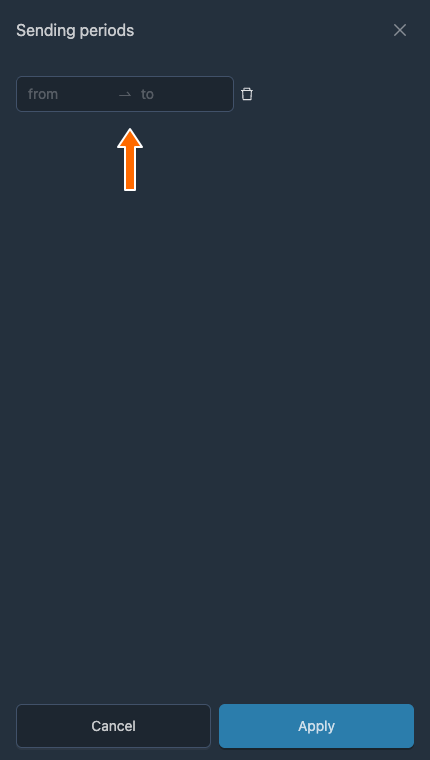
- “Sending periods” let you set one or more time windows for forwarded messages. This option is only available with the scheduler enabled. To configure sending periods, click the time range beneath the enabled scheduler. An additional dialog opens where you can manage all sending periods.
- “Delay” lets you set a random delay before forwarding a message.
- “Interval” lets you set a minimum time interval between forwarded messages. This is useful if you want to spread posts out over time instead of publishing them all at once.
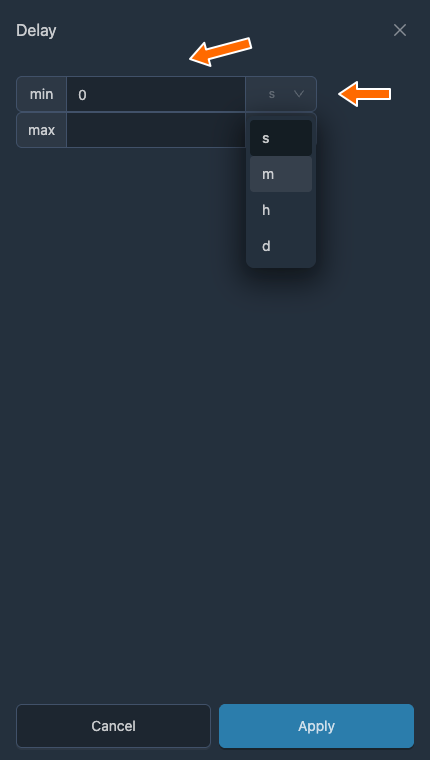
The scheduler is available for a sender connected by phone. Delay and interval ranges are set using “min” and “max” values; choose the time unit in the duration field.
Editing settings
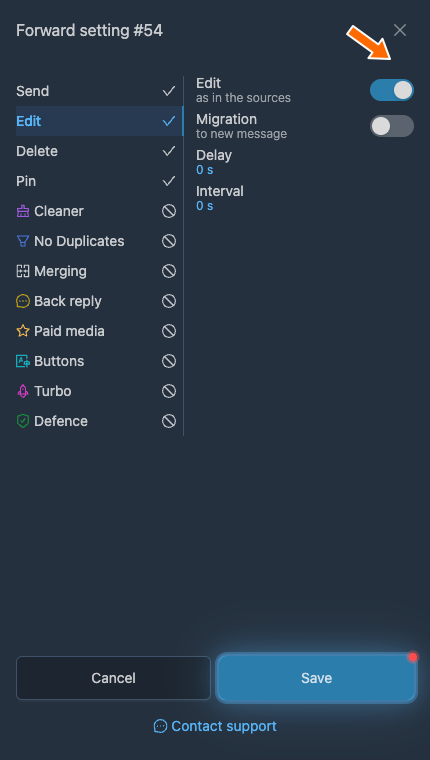
The “Edit” tab contains settings related to edits to source messages:
- “Edit as in the sources” determines whether an edit to an original message in the source is also applied to the corresponding forwarded message in the destination. In “Copy” mode, this is enabled by default, but you can turn it off if needed. It is unavailable in “Repost” mode because of Telegram's technical limitations.
- “Migration to new message” turns editing events into new messages. If “Edit as in the sources” is enabled, migration only applies to messages that were not previously forwarded by the service but were edited in the source. If “Edit as in the sources” is disabled, migration applies to every editing event in the source: all of them are sent as new messages to the destination chat.
- “Delay” lets you set a random delay before applying an edit to the corresponding forwarded message.
- “Interval” lets you set a minimum time interval between applying edits to the corresponding forwarded messages.
Deletion settings
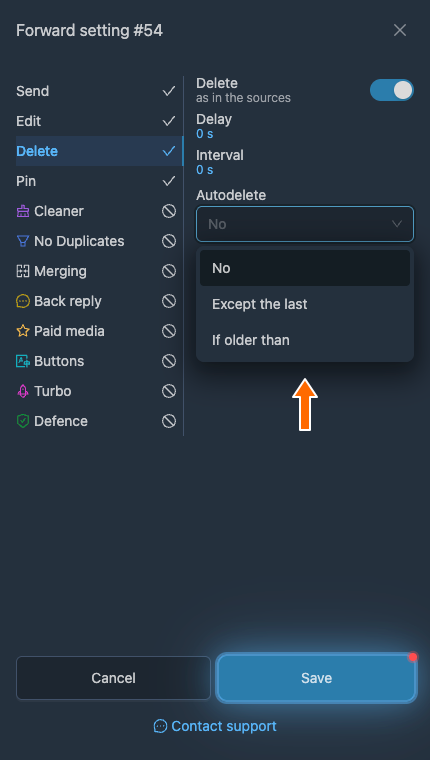
The “Delete” tab contains settings related to the deletion of source messages:
- “Delete as in the sources” determines whether deleting an original message in the source also deletes the corresponding forwarded message in the destination.
- “Delay” lets you set a random delay before deleting the corresponding forwarded messages.
- “Interval” lets you set a minimum time interval between deleting the corresponding forwarded messages.
- “Autodelete” is a mode in which forwarded messages are deleted automatically according to the conditions you specify. It is disabled by default. You can choose the following conditions for automatically deleting forwarded messages:
- delete everything except the last N messages, so that only the most recently forwarded messages remain visible and older ones are deleted.
- delete all messages older than N seconds, so that each message is deleted after the specified amount of time.
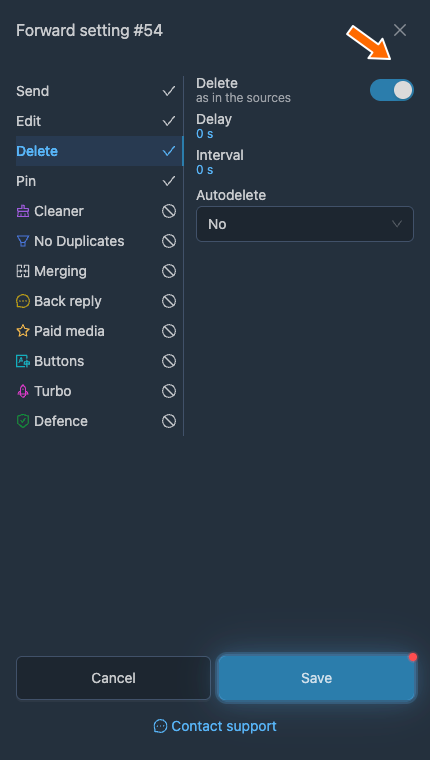
In “Autodelete”, choose the condition and its value; “No” disables automatic deletion.
Pinning settings
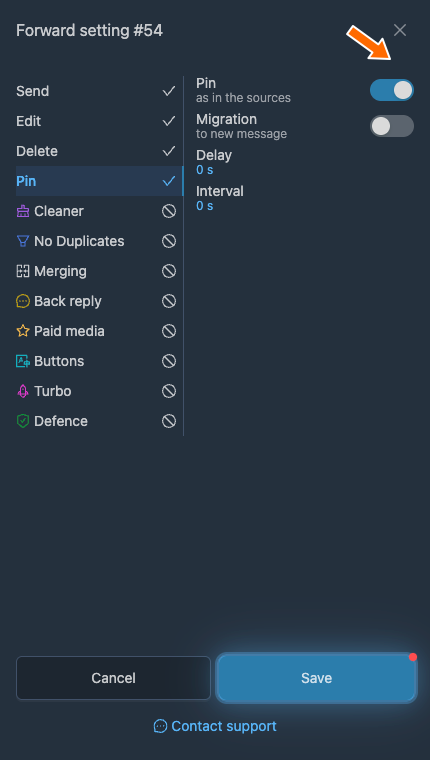
The “Pin” tab contains settings related to the pinning of source messages:
- “Pin as in the sources” determines whether pinning an original message in the source also pins the corresponding forwarded message in the destination.
- “Migration to new message” turns pinning events into new message events. If “Pin as in the sources” is enabled, migration only applies to messages that were not previously forwarded by the service but were pinned in the source. If “Pin as in the sources” is disabled, migration applies to every pinning event in the source: all of them are sent as new messages to the destination chat.
- “Delay” lets you set a random delay before pinning the corresponding forwarded message.
- “Interval” lets you set a minimum time interval between pinning the corresponding forwarded messages.
Cleanup settings
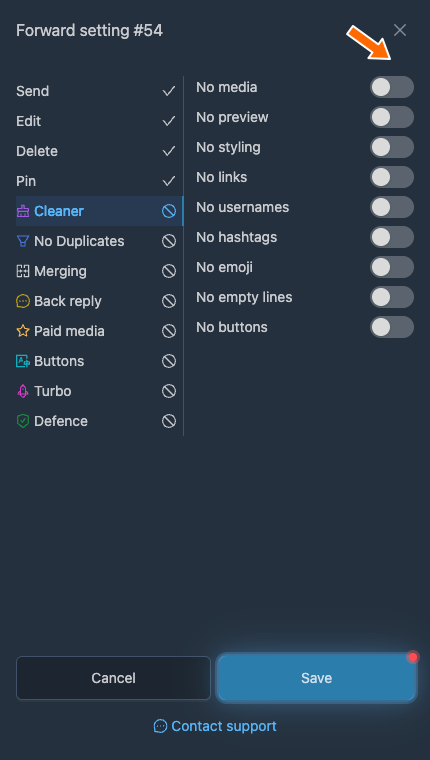
The “Cleaner” tab contains options for removing unwanted content from forwarded messages:
- “No media” removes media from forwarded messages so that only the text reaches the destination.
- “No preview” removes link previews from forwarded messages.
- “No styling” removes all styles and formatting from the text of forwarded messages.
- “No links” removes all links from the text and buttons of forwarded messages.
- “No usernames” removes all usernames such as @test from the text of forwarded messages.
- “No hashtags” removes all hashtags such as #test from the text of forwarded messages.
- “No emoji” removes all emoji from forwarded messages.
- “No empty lines” removes unnecessary blank lines from forwarded messages.
“No buttons” removes buttons from the forwarded message.
Duplicate filtering settings
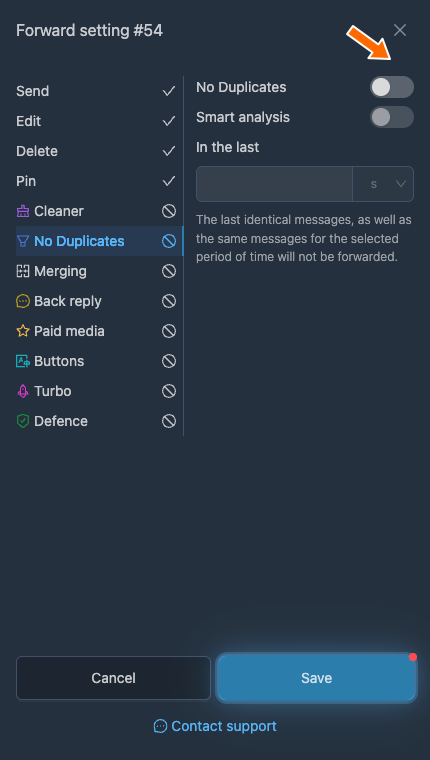
The “No Duplicates” tab contains settings for filtering out identical messages:
- “No Duplicates” filters out identical messages during forwarding. Hashes of the text and media are compared to determine whether a message is a duplicate.
- “Smart analysis” changes how messages are compared. When enabled, messages are compared without considering text styling. For messages with media files, only the files are compared; their text is excluded from the comparison.
- “In the last N sec” sets the time window over which messages are compared to identify duplicates. Specify a positive duration. If you enable the filter without setting a duration, one hour is used; a disabled filter does not check for duplicates.
Merging settings
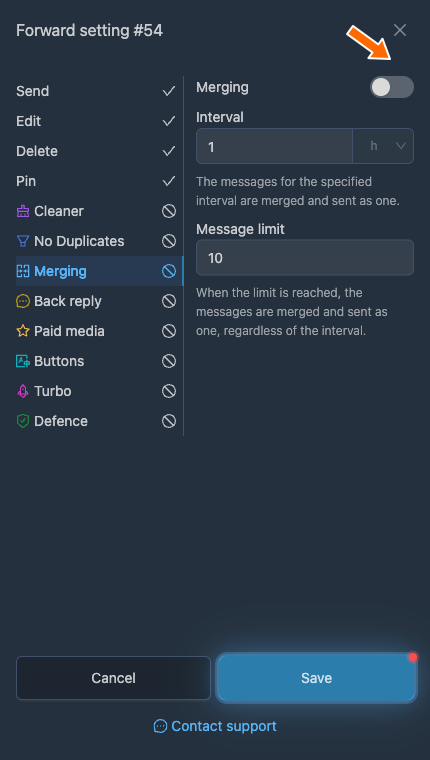
The “Merging” tab contains settings for combining several messages into one:
- “Merging” makes the service collect incoming new messages and send them as one. Combined with AI processing, this lets you create short, concise news summaries from a large number of sources with a high volume of messages.
- “Interval” is the period during which the service collects messages to combine into one.
- “Message limit” sets the maximum number of messages to merge. When that limit is reached, the messages are combined and sent as one, regardless of the time interval.
Merging is available in “Copy” mode.
Back reply settings
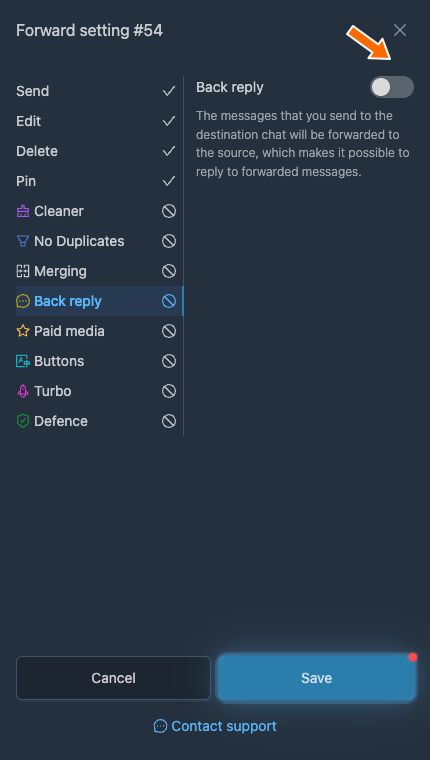
The “Back reply” tab contains the switch for enabling back reply for a forward. It lets you send replies to forwarded messages back to the source.
Combining “All personal dialogs” as the source, “Sync topics with sources” in the destination and “Back reply” lets you set up support and talk to all your customers in one group with topics. Each topic is a separate copy of a customer chat. When you reply in that topic, your message is forwarded back to the customer on behalf of the listener account.
Back reply is available with one source: a specific chat or all private conversations belonging to one listener.
Paid media settings
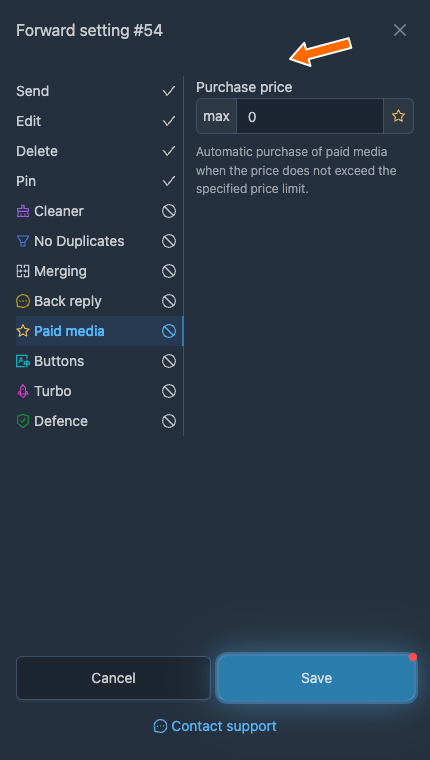
On the “Paid media” tab, “Purchase price” sets the maximum price for automatically purchasing paid media. A value of zero does not enable purchases. Set a positive limit only if you intend to pay for this content.
Button reading settings
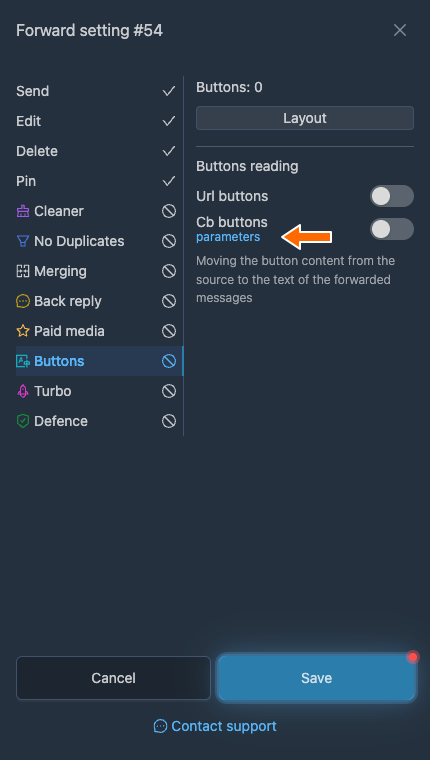
On the “Buttons” tab, the “Buttons reading” section contains settings for automatically adding the content of buttons in forwarded messages to the message text:
- “Url buttons”, when enabled, adds the links from the source message's URL buttons to the end of the message text.
- “Cb buttons”, when enabled, makes the service simulate clicking any callback buttons in a forwarded message. If the buttons return a response, it is added to the end of the forwarded message.
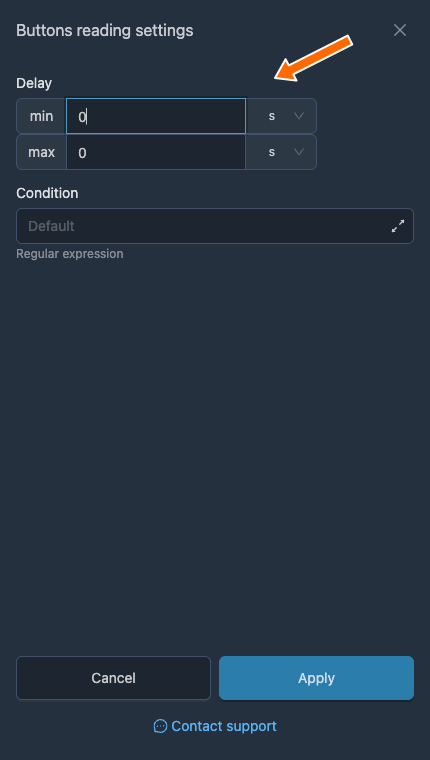
- “Delay” sets a random delay before clicking a callback button to simulate a user's click.
These settings do not affect whether the buttons themselves are sent; they only add their content to the forwarded message's text. To forward the buttons themselves, simply select a bot account as the sender. Buttons will then be forwarded by default.
To set the delay for reading callback buttons, click “parameters” next to “Cb buttons”.
Turbo mode settings
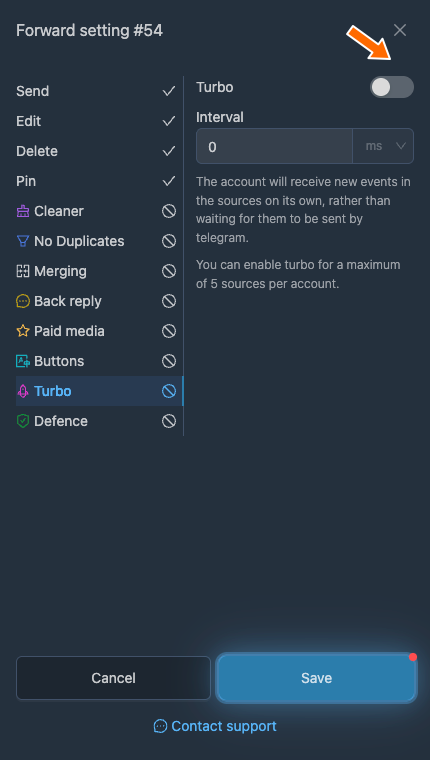
The “Turbo” tab contains settings for turbo forwarding mode:
- “Turbo”, when enabled, makes the listener account retrieve new events from sources itself instead of waiting for Telegram to send them.
- “Interval” specifies how often the listener account asks Telegram for new events in the source.
This mode is only recommended when Telegram takes more than 5 minutes to notify the listener account of new messages in the source, which can happen in very large channels or groups. In all other cases, enabling turbo mode may actually slow down the receipt of new events from Telegram.
Turbo can be enabled for a maximum of five sources per account. The interval is specified in milliseconds.
“Defence” settings
If the source's authors can access the destination chat where you forward their messages, they can identify the account doing the forwarding. They do this by removing channel or group members one at a time and checking after each removal whether forwarding has stopped. If forwarding stops after a member is removed, that was the account forwarding the messages.
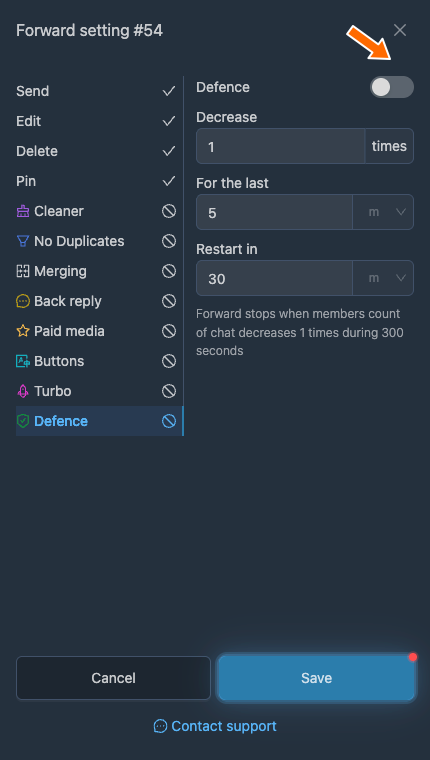
The “Defence” tab contains settings to protect against this method of identifying an account. It stops forwarding if the number of members in the source decreases within the time window you specify:
- “Defence” turns on protection for this forward.
- “Decrease” sets how many times the source's total member count must decrease before forwarding stops.
- “For the last” sets the time window over which decreases in the source's member count are counted to stop forwarding.
- “Restart in” sets the pause after which forwarding starts again if “Defence” previously stopped it.
Choose the appropriate time unit in the duration fields.
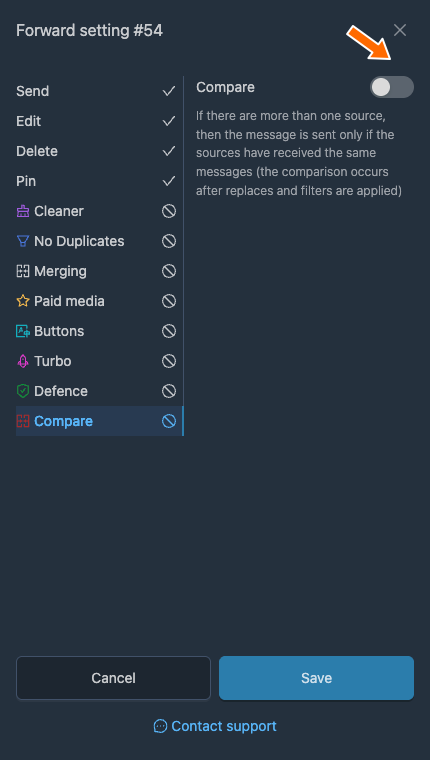
Comparison settings
The “Compare” tab contains the switch for enabling comparison mode for a forward. This mode is only available for a forward with two or more sources.
With comparison enabled, a message is only forwarded if exactly the same message has arrived in the other sources.
Consider a forward whose first source is a chat with “Bot 1”, listened to by “Account 1”, and whose second source is the same chat with “Bot 1”, listened to by “Account 2”. Although it is the same bot chat, the bot may send different messages to different accounts. If comparison mode is enabled, forwarding only occurs when “Account 1” receives the same message from the bot as “Account 2”.
Messages from the selected sources are compared after replacements and filters are applied.
Sources and destinations in forwards
A forward can have several sources and only one destination. Sources and the destination are usually selected when the forward is first created, as described in detail above, but you can also change them in an existing forward.
Changing the sources in a forward
A forward's sources can be any public or private Telegram chats, channels, groups, bots or groups with topics that the accounts connected to the service belong to.
If you have connected more than one account, you can choose a specific listener account for each source. The listener is the account that “listens” for, or simply receives, messages to be forwarded. Receiving messages from a source does not make the account appear active or mark those messages as read.
To change, remove or add sources in an existing forward:
- On the “Forwards” page, click the “Edit: Sources” pencil button in the row for the forward you need. If there are several sources, you can also open the list by clicking the source count button.
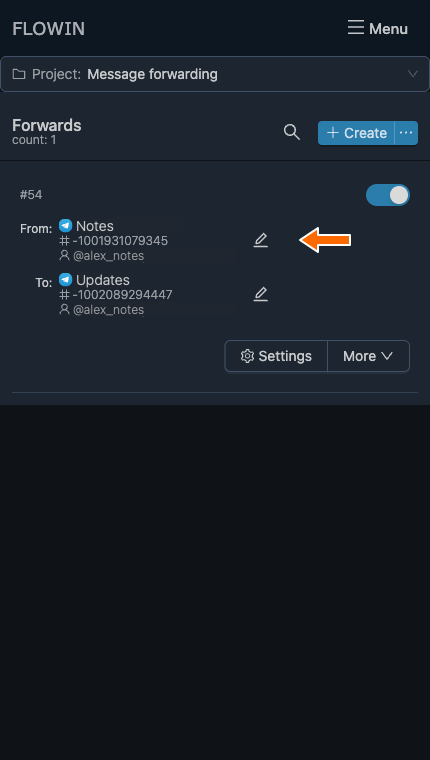
Editing sources. 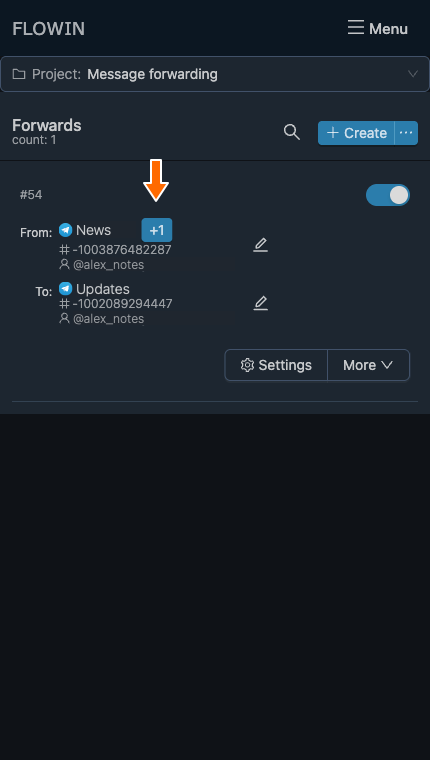
- In the list that opens, click “Add” to choose a new source and listener. To replace a source or its listener, remove the previous source using the × button and add the one you need again.
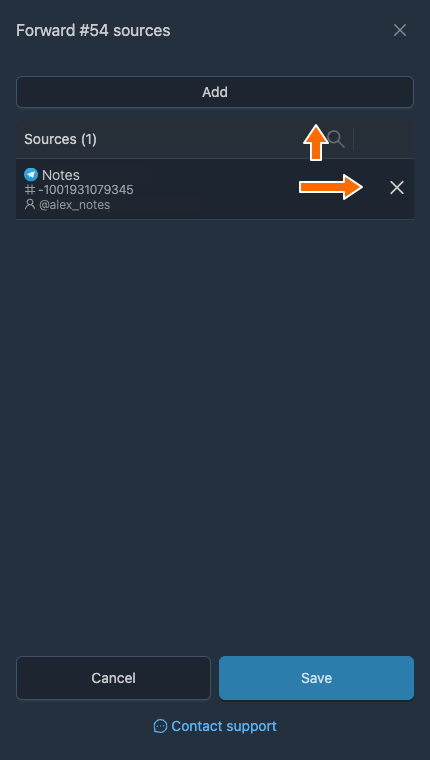
Adding a source to the list. 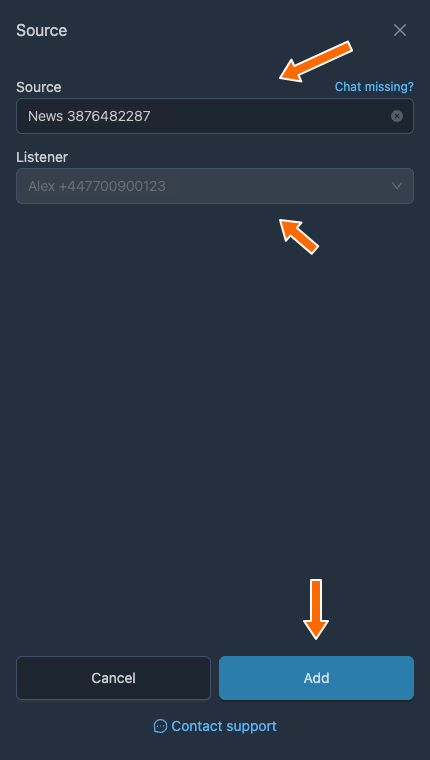
Choosing a new source and listener. - Click “Save” and check the sources in the forward's row.
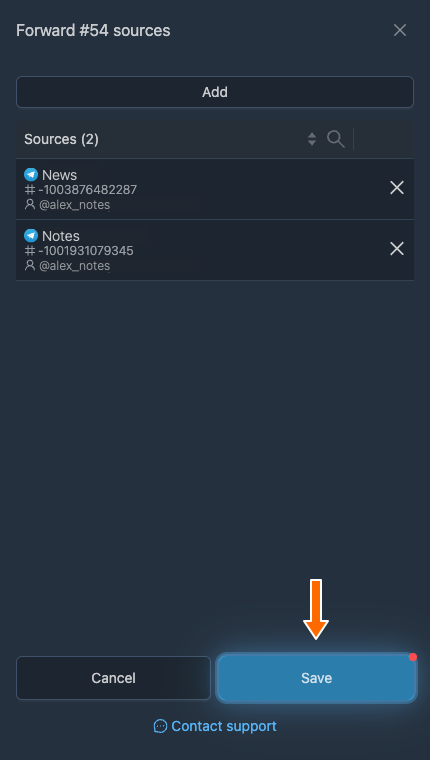
Saving the source list.
Changing the destination in a forward
A forward's destination can be any public or private Telegram chat, channel, group, bot or group with topics that the connected accounts belong to and have permission to post in.
A forward can have only one destination. To send messages from one source to several destinations, create several forwards with the same source and different destinations.
If you have connected more than one account, you can choose a specific sender account for the destination. The sender is the account that sends the messages received by the listener to the destination chat. The sender account appears online when it sends a message. It does not receive a notification about that message, and the message is already marked as read for that account because it is the sender.
To change the destination or sender in an existing forward:
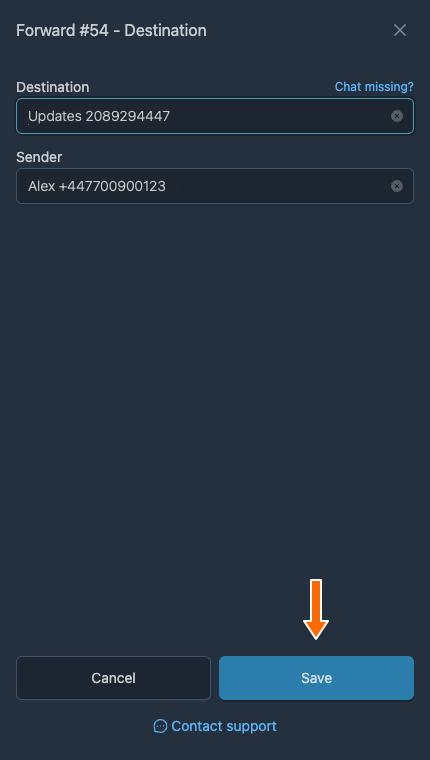
- On the “Forwards” page, click the “Edit: Destination” pencil button in the row for the forward you need.
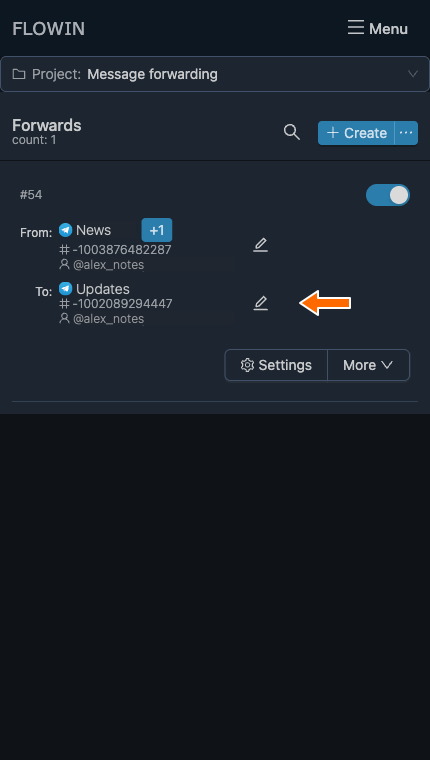
Editing the destination. - Choose the “Destination” and “Sender”. For a group with topics, select a specific topic or “Sync topics with sources”.
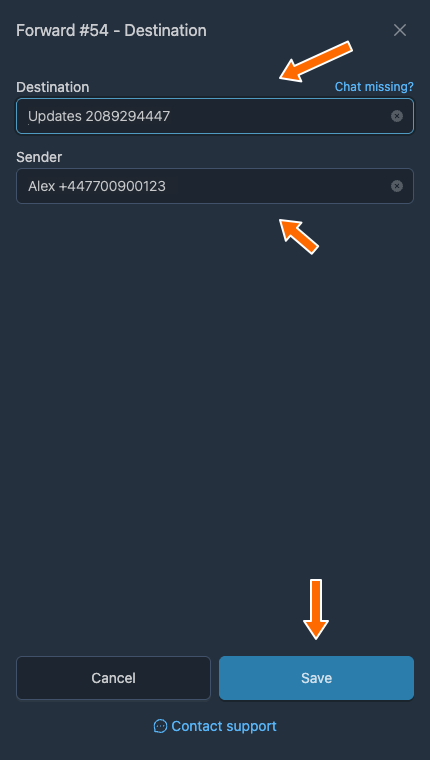
Choosing the destination and sender. - Click “Save” and check the destination in the forward's row.
Settings templates for forwards
Sometimes you need to use the same settings for several forwards. Configuring each one manually can take a long time, especially if there are many. A settings template makes this much easier.
You can use any configured forward as a settings template to apply to other forwards. The steps for applying this kind of template are described below:
- On the “Forwards” page, open “More” → “Copy parameters” for the configured forward.
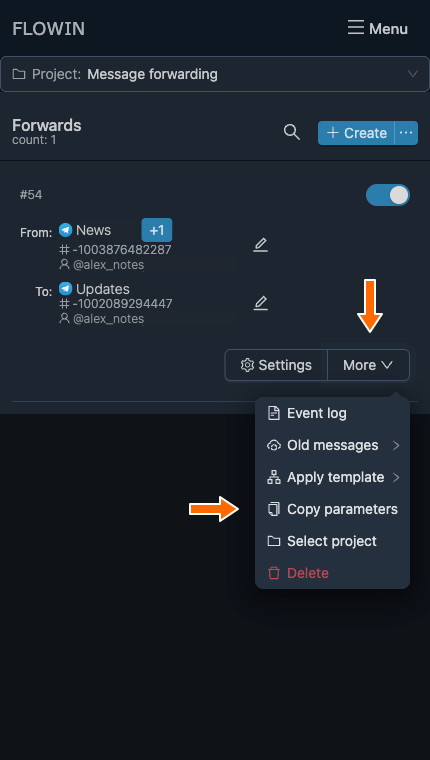
Copying a forward's parameters. - Click “parameters (8)” and leave the groups you need selected: settings, filters, replacements, watermarks, webhooks, AI assistants, buttons and translations.
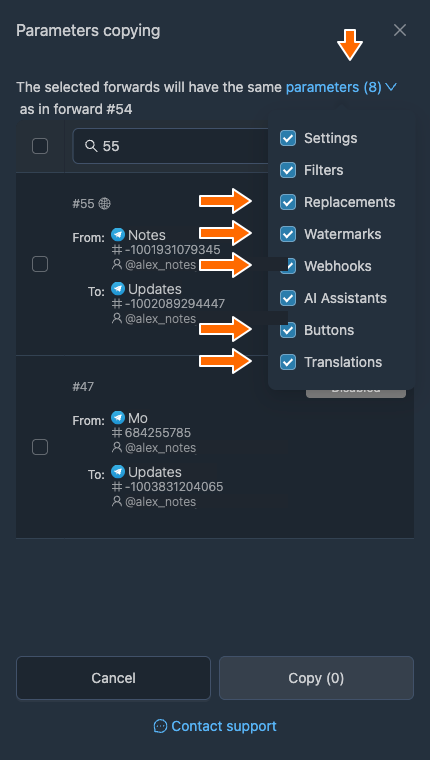
Choosing which groups of parameters to copy. - Select the forwards you want to apply the chosen parameters to. If needed, find them using the “Search” field.
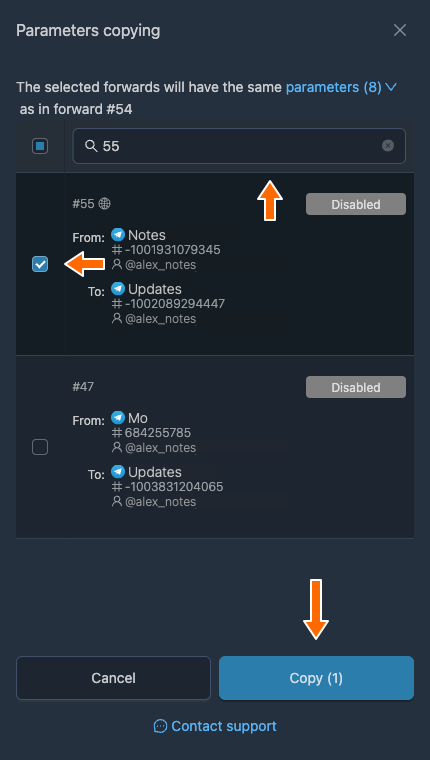
A forward selected for copying parameters. - Click “Copy (N)”, where N is the number of selected forwards. Then check their settings.
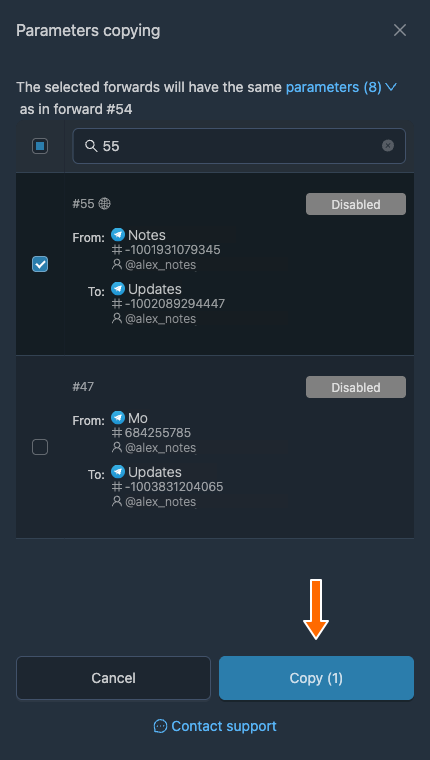
After these steps, the selected forwards will have the same set of parameters as the forward used as a settings template.
For repeated use, you can save separate templates in the “Templates” section. To apply a saved template, use “More” → “Apply template”: choose your own template, a template by token or a public template.
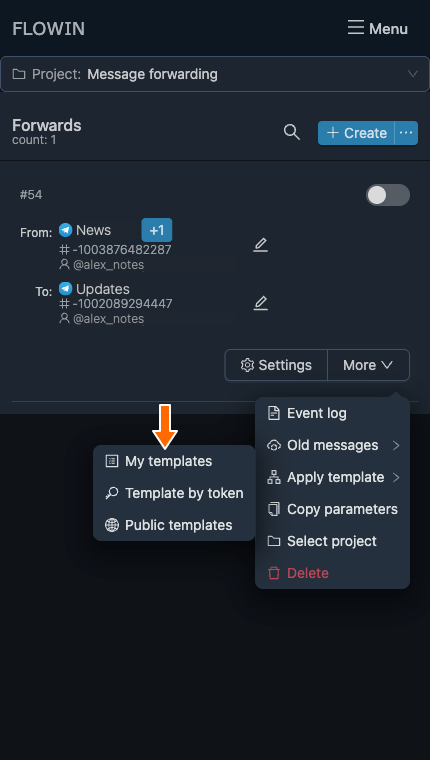
Bulk actions on forwards
The “Forwards” page in the control panel lists all your forwards, which you can manage using bulk actions. To enter bulk action mode:
- Click “⋯” next to “Create” and choose “Select”.
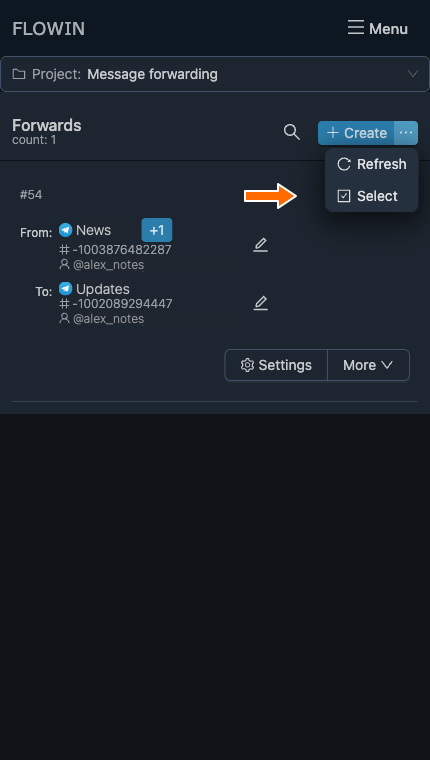
Entering forward selection mode. - Select the forwards you need using the checkboxes.
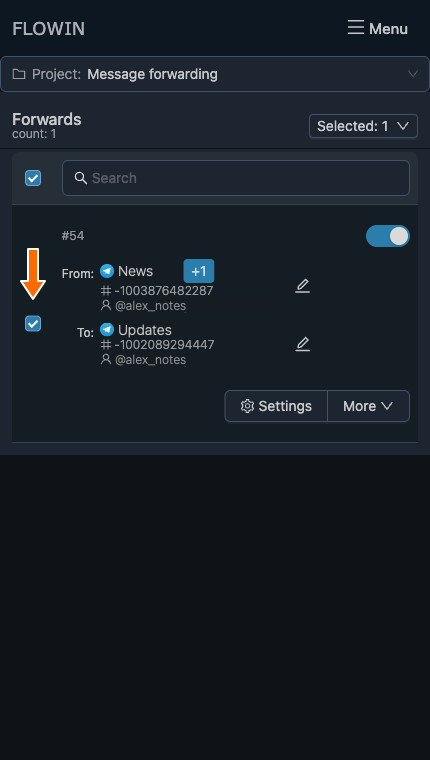
A selected forward. - Click “Selected: N” and choose an action: activate, stop, update chat names, restore messages, select a project or delete the selected forwards. “Cancel selection” exits selection mode.
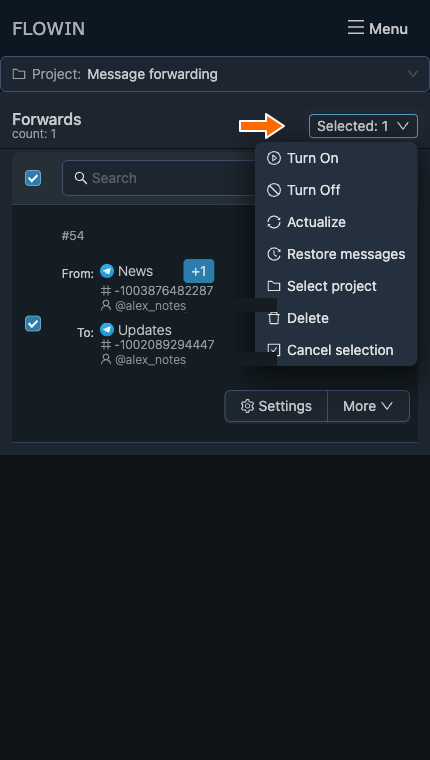
Actions for selected forwards. - If the action asks for confirmation, check the selected forwards and confirm. Once it finishes, check the result in the list.
The forwarding event log
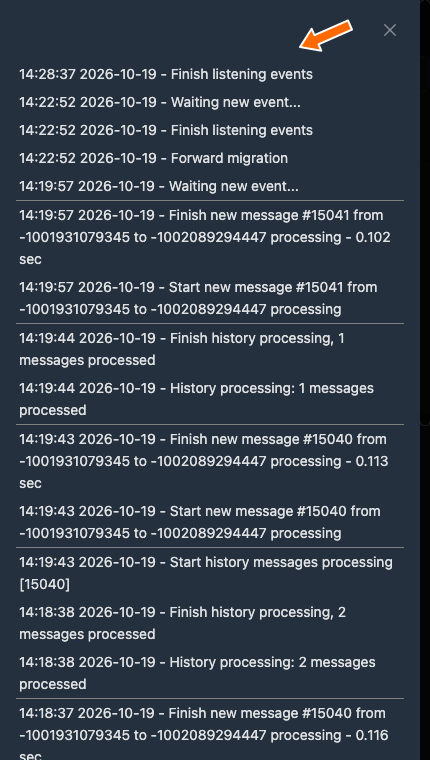
Each forward has its own event log containing information about every event it processes. You can use the log to monitor forwarding and investigate the causes of errors or delays.
The event log has three types of entry:
- A white entry is an informational message.
- A yellow entry is a warning about delays or minor errors and their causes.
- A red entry indicates errors that prevented a particular message from being forwarded.
To open the log, select “More” → “Event log” in the forward's row. “Refresh” retrieves the latest entries.
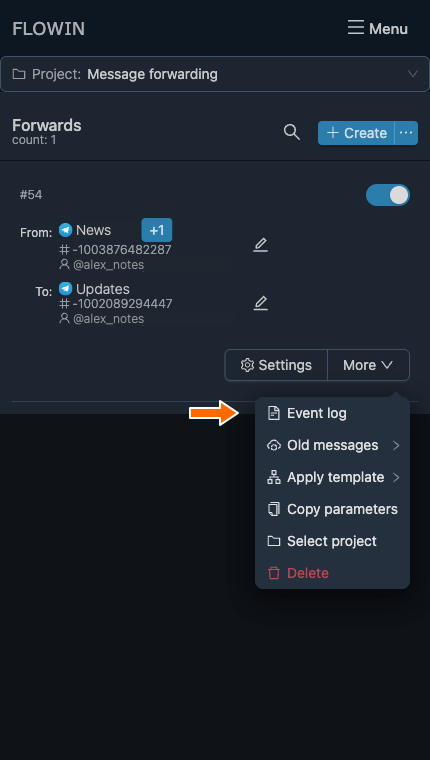
Available actions for forwards
The “Forwards” page in the control panel displays all the forwards you have created, along with their controls.
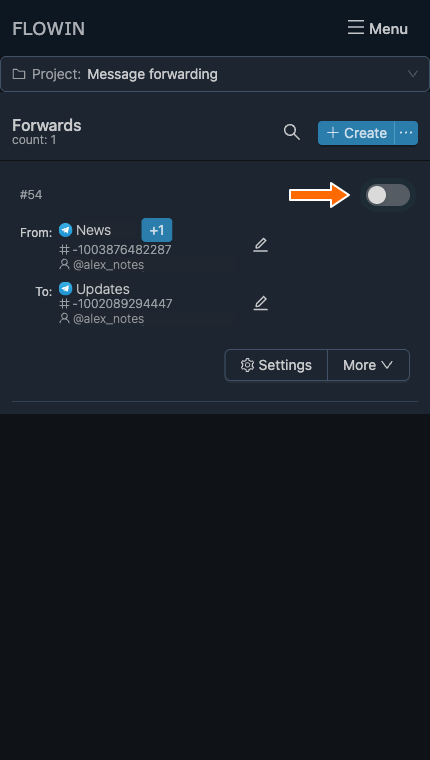
The “Active” switch
The “Active” switch in a forward's row stops and starts it. When the switch is off, forwarding is stopped; when it is on, forwarding is active. Its color depends on the mode and interface theme: “Repost” is yellow, while “Copy” is blue or green.
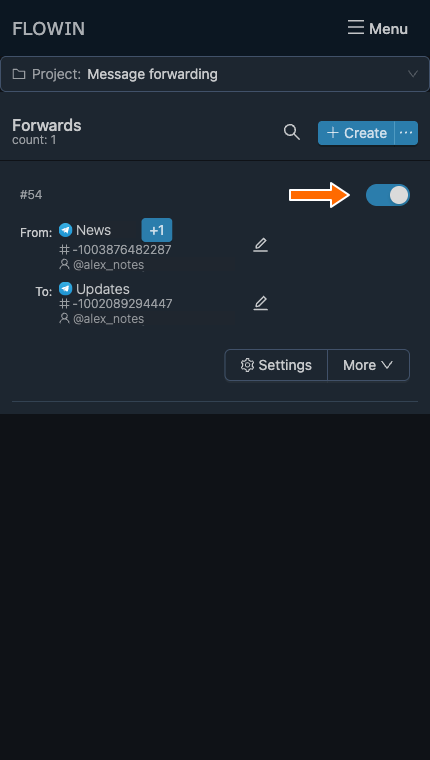
Settings and other actions
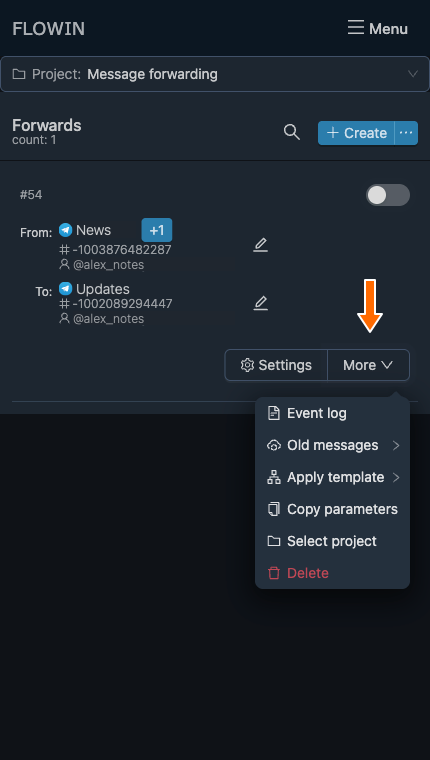
Each forward's row has a “Settings” gear button and a “More” menu. They provide access to:
- “Settings”: the basic forwarding settings.
- “Event log”: processed events, warnings and errors.
- “Old messages”: start forwarding history by period or by links, if the selected sources support that method.
- “Apply template”: choose your own template, a public template or one shared by token.
- “Copy parameters”: apply this forward's parameters to others.
- “Select project”: add the forward to a project.
- “Delete”: delete the forward after confirmation.
Frequently asked questions
Is one bot enough to forward messages in Telegram?
Yes, if the bot has been added to the source, can receive messages there and has permission to send them to the destination. One account can then serve as both listener and sender. In “Repost” mode, both roles must be performed by the same account.
If you cannot add a bot to the source you need, use a Telegram account connected by phone that has access to that chat. Connecting a bot to FLOWIN does not by itself give the bot access to every channel.
Why is the channel I need missing from the source or destination list?
Check which account is selected and whether it has access to the channel. Then open “Chat missing?” in the relevant field and refresh the chat list. If the channel still does not appear, check the account's connection and permissions: refreshing the list does not itself grant access to a chat.
Why didn't automatic message forwarding copy the old posts?
After you create a forward, FLOWIN processes new messages. History forwarding is started separately through “Old messages”. Forwarding by period requires a Telegram account connected by phone with access to the source history. The available methods are described in the section on old messages.
How can I forward messages from one source to several channels at once?
Create a separate forward for each destination channel. A forward can have several sources, but it has only one destination. You can change each forward's settings independently, for example using filters to send different messages to different channels.
Where should I start if a message hasn't arrived?
Find the message in the forwarding event log and read the processing result. Check that the forward is active, the accounts are connected, the listener can access the source and the sender can post in the destination. Also check the filters: they may have excluded the message.
If you need help from support, provide the forward, the event time and the error text. Do not send tokens, sign-in codes or passwords.
Can I set up automatic posting in Telegram from another channel?
Yes. Specify the source channel and destination channel, choose accounts with the necessary access and leave the forward active. New posts will be published in the destination automatically. To change the text or make other modifications, choose “Copy” mode.
In this guide, automatic posting means publishing messages from another Telegram chat. It does not cover posting from external social networks or using a content calendar.